Simple Color Popping Technique


A currently very popular digital imaging technique is that of Colour (or Color) Popping. A colour image is converted to monochrome (black and white) and then part of the colour is restored to the image. This can have a very powerful effect and convey more to the viewer than if the image had remained all colour, or was converted totally to monochrome.
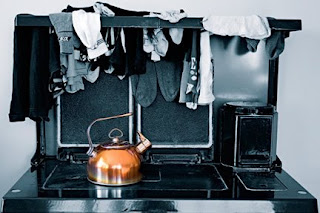
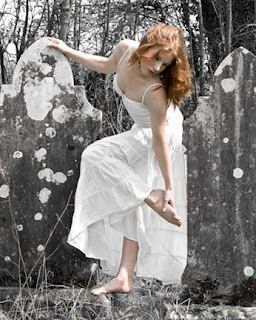
My two images above, both demonstrate the effect, and actually use a similar dominant colour - but the techniques employed to create them were completely different - and one was far more complex, and time-consuming than the other.
The "Copper Kettle" shot (Winner of the 2007 Guru Award for Photoshop Excellence from the American NAPP organisation) was taken in the kitchen of a friend's house, in Tipperary, Ireland and the final image produced in Adobe Photoshop CS2. It took about 10 days to complete, with me spending about 2 hours a night on it.
The basic steps included: Adding a layer mask before converting a colour image to greyscale inside CS2. I then used the plug-in software "Exposure" to give the black and white image a 'look' of Ilford HP5 film, which gave those deep, rich blacks. I then tidied up the background, removing marks and spots on the wall, pipes coming from the back of the stove and blemished on the metal itself, using the clone and heal tools. This gave a nice, clean "studio" look to the background. I then painted away part of the layer mask, over the kettle, to bring back the 'copper' colour, which I then enhanced using levels, saturation and contrast. Removing the layer mask was the most time consuming and painstaking part of the process, especially over the very thin handle, and I had to restart the process several times.
The second shot (Jane Holding Foot) is a very successful exhibition print (in terms of sales) and was made in Adobe Lightroom. it took about 10 minutes to complete. I simply selected a "Preset" called Wow-c_HSL_ONLY_Brown, which instantly converts the colour image to black and white, but leaves the brown tones in place. Because Jane's Red hair is effectively in the "brown" colour space, it stayed pretty much as it was when I took the shot. I did enhance the saturation slightly, and increase the black tones to improve the monochrome look. I also slightly increased the red tones, to give Jane's skin some colour. It's a very easy and simple technique that requires very little skill other than knowing where to get the presets from, and where to find the selective colour sliders in Lightroom.
The selective colour sliders are about halfway down on the right-hand panel in the develop module of Lightroom.
WOW One-Click development presets for Adobe Photoshop Lightroom were created by Photoshop Hall of Famer and renowned Photoshop educator, author and photographer Jack Davis. These presets expand the creative control that photographers have when processing their images.
You can get a full range of WOW presets for Lightroom BY CLICKING HERE and they are free!


Comments
Post a Comment
Please give your name when commenting.
All comments will be moderated, so please allow for a slight delay before your post appears on the Blog.